Creating Diamonds with EQ5 Custom Set
A friend read my previous blog entry on creating triangular blocks in EQ5 and declared me a real "quilting nerd". Well, I guess that description fits me pretty well, since I do sort of take the nerd's
approach to doing some of this. Wait until she reads this entry!
In today's "issue", I want to focus on how to create diamond shaped blocks using EQ5 Custom Set. EQ5 Custom Set quilts are very handy, allowing you to create build quilts that don't necessarily
conform to standard layout styles. Additionally, the quilts you create can be used like quilts from the EQ Layout Library....you can set different blocks into the layout to play with the variation.
The process of creating a diamond shape block is is fairly easy in theory. To do this, create a Custom Set quilt. Before starting, make sure you have the Graph Pad turned on. To turn it on, use the View menu, and make sure there is a check box next to the Graph Pad entry.
Using the Plain Block tool, use shift-drag to set a plan block onto the quilt. At this point, it doesn't matter where....just pick a convenient place for it. Now use the graph pad to adjust the height and width to be a proper square. Don't forget that you need to select the block using the adjust tool to enable the graph
pad.
Now we need to rotate the block so that it is positioned on-point. This needs to be done with the graph pad again. In the graph pad rotation field, change the angle from "0" to "45".
Now that the block has rotated, resizing the block will distort it into a diamond. Using the mouse, grab the resizing handle on the top of the block and drag it upward. Voila, it is now a diamond! Note that you need to resize this block by dragging it....if you change the size in the GraphPad you only change the size
of the square.
Ok, that's the easy part. Things get harder if you A) want a precise 60- or 45-degree diamond, or B) want the edge of the diamond to be a particular size. Unfortunately, EQ5 doesn't have any tools that will help you with this process, so a bit of manipulation and a handheld calculator is required. Ok, I actually use the Calculator program that comes with Windows, but the principle is the same.
Bear with me, as I'm about to describe the mathematical basis for this first, since I want to record how this works so I don't forget it like the last time
Anyway, the critical step of this process will be the starting size of the square. When the square has been set on the quilt and rotated 45-degrees, the length of the square sides remain the same, but the size of box that encloses the block is now size of the diagonal dimension of the square. For example, if we start with a square
4"x4", after rotation, the block's size is now 5.64"x5.64". The mathematical relationship is fairly simple. In a square, the length of the diagonal is the length of side times the square root of 2...ugh, more math. Ok, forget mentioned square roots, and just remember the number 1.41. Another one of those magic
numbers. 1.41 IS the square root of two, so to find the length of a squares diagonal, you just multiply the size of the square by 1.41. So the diagonal of a 4" square is 5.64". The diagonal of a 5" square is 7.05", a 6" square is 8.46". If you end up doing this a lot, you might want to make a small table with the values for common block sizes.
Let's tackle the 60-degree diamond first, since that is a little easier of the two standard cases to deal with. When you stretch the block into a diamond shape, the GraphPad height and width numbers change to reflect the edge lengths of the diamonds. To create a diamond with 6" edges, you stretch until the Graph Pad numbers read "6.000". Using the mouse, you will rairly be able to get exactly to your target number, so accept the the closest value you can get. DO NOT use the Graph Pad to adjust the numbers to the target. Resizing with the Graph Pad at this point will skew the shape of the diamond.
Ok, at this point, we have a diamond with 6-inch edges, but unless you were extremely lucky, this diamond is ot a 60-degree diamond with 6-inch edges. The trick to getting a 60-degree diamond is carefully chosing the size of the original square at the start of the process.
How do we pick the size? A 60-degree diamond has a handy property. Since these diamonds consist of a pair of equilateral triangles, a proper 60-degree triangle will be the same length across the points of the diamond as the length of the edges. So, to create a 60-degree diamond with 6" sides, we need to use a starting square that measures 6" across the diagonal. See, there was a purpose to the previous discussion about the square
root of 2 and the 1.41 magic number
If you resize your block to 4.25x4.25 inches, rotate by 45 degrees and stretch until the Graph Pad reads 6 inches (or close to 6 inches), you will end up with a correctly sized 60-degree diamond. Note that
the angle shown in the Graph Pad rotation field now reads 60 rather than the starting 45 degrees. Frankly, I have no idea what that means at this point, but you can treat this as another "magic number"
to double check that you have sized this correctly. If you make two copies of this block, and change the rotations to 0 and 120 degrees, you now have the elements you need to build a 6-pointed star
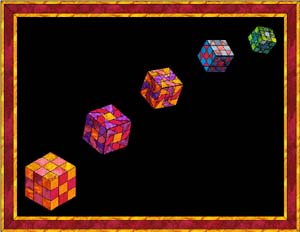
from these diamonds. You can also rearrange these to create a cube for a tumbling block design.
Ok, deep breath...now we tackle the 45 degree diamond. The process is largely the same, but selecting the starting size is a little more complicated. In the end though, it boils down to a single "magic number" again.
In a 45-degree diamond with 6" sides, what is the length across diamond? This required me to reactivate some long dormant brain cells to relearn a little trigonometry, but in the end, the calculations were pretty simple.
If you draw a line from the narrow point of the diamond to the midpoint of the base, you create a pair of right triangles with angles of 22.5, 67.5, and 90 degrees. The length of the base can be calculated by
multiplying the edge length by cos(67.5). No need to use a scientific calculator, just use the value .383. Don't even bother to remember this number, I promise I'll reduce this to a single calculation by the time I finish. Again, assuming we're trying to create a diamond with 6" edges, the base of this triangle is 6 times .383, or 2.298 inches. However, that is just half of the width of the diamond, so we need to double it to 4.596.
Now we know what we need to create a 45-degree diamond, since the process is the same as a 60-degree diamond. We need a starting square that measures 4.596 across the diagongal. We already know
how to do this, just divide this length by 1.41, giving a starting square of 3.26 x 3.26. Cool!
Now for a little trick. Let's do this calculation for a diamond with 1" edges. Going through the process again, we end up needing an initial square of .543" x .543". This is my second magic number! Larger diamonds will scale up directly from this 1" size. Multiply 6 by .543, and you get 3.258....the same size we
calculated using the long method! Again, you might find it handy to create a table of starting sizes for common diamond dimensions rather than redo the calculation each time.
When you stretch the 45 degree triangle to size, the rotation angle displayed in the Graph Pad will read 67 this time. To build a star from this, you need to make copies of the diamond and rotate to 0, 45, 90, and 135 degrees.
Ok, let's summarize the process:
- Pick the edge size of the diamond. If you want a 45-degree diamond, multiply that length by .543. If you want a 60-degree diamond, divide that length by 1.41.
- Set a square block on the layout using the Plain Block tool.
- Use the Adjust tool and Graph Pad to resize the block into square using the size calculated in step 1.
- Use the Graph Pad to rotate the block to 45 degrees.
- Using the top center resizing handle, drag the block until the height and width displayed in the Graph Pad are "close" to your target edge size.
You are now done. Since you used the Plain Block tool to set the original shape, you can now use the Set tool to drop any block into the diamond, and it will be reformed into a diamond shape. If you create a quilt using this process, you've just created a reusable layout like those in the Layout Library.
Here is a design I created in EQ5 using this process:
posted by Rick McGuire @ 5:49 AM
0 comments
![]()
![]()


0 Comments:
Post a Comment
<< Home