Wednesday, May 11, 2005

A Snail's Trail

"Do not follow where the path may lead...Go instead where there is no path and leave a trail."  — Robert Frost

Ok, back to the round Robins.  The next one I received was Ken’s.  I was really please to receive this one.  I’d sort of been on Ken a little to try something more challenging.  So far, most of his quilts had been different color variations of the first quilt he ever made (from a class).  I think he’d made at least 10 of these.  They looked great, but he needed to step outside of his comfort zone a little more.  I was really please to see he’d done a snail’s trail block for his round robin. 

One interesting thing about Ken.  He’s color blind, but rather than be a handicap as a quilter, it seems to work out to his advantage.  His color blindness works out to be a built-in value finder.  As a result, Ken has a very good value sense when it comes to picking fabrics…and he doesn’t get obsess over color choices.  As long at the values provide good contrast the colors all just go together.

The first border, done by my God-child Azureen.  Az loves working with very bright fabrics.  She’d have been right at home in the 60s, since she prefers very bright primary colors in her quilts.  She also loves orange…yet another quilter not afraid of the dreaded orange.

The border itself is a variation of the braid pattern Az learned from Anne Gallo the previous fall. This colorful border pulled out the color from the paint-splatter dots in the inner block.  It worked very nicely.

When I received this quilt, I’d just finished taking the Chinese Lattice class from Carol Miller, the Dean of Quilt University.   Here is my finished Chinese Lattice quilt.  This is still on the UFO list, but I really liked the way the border wrapped around the inner block, and decided to reuse the design here.  And, as chance would have it, I’d just finished a fresh batch of hand dyed fabric…why dye if you’re not going to use it.  This border worked out very nicely, providing a nice calming effect for the bold colors Az used.

Next up was Marcia…and this was an amazing border, with both applique and reverse applique.  The purple background really enhanced the colors of the hand dyes inside of it. 

Outside of that was a simple star design by Emerald.  Once again, because the previous border was complicated, a simple border was used, which set the stage for Cindy to go wild with a scrappy outer border that echoed the colors used by Azureen.

Monday, May 09, 2005

An Eternal Golden Braid

 "All the good ideas I ever had came to me while I was milking a cow."  (Grant Wood)

It was back to the Henry Farm Inn again this weekend, for another wonderful weekend of sewing with Anne Gallo and Susan Raban.  We spent an extra day this time, arriving on Thursday evening, departing on Sunday.  Normally these workshops run Friday-Sunday, but we’d decided we wanted more time to work on things.

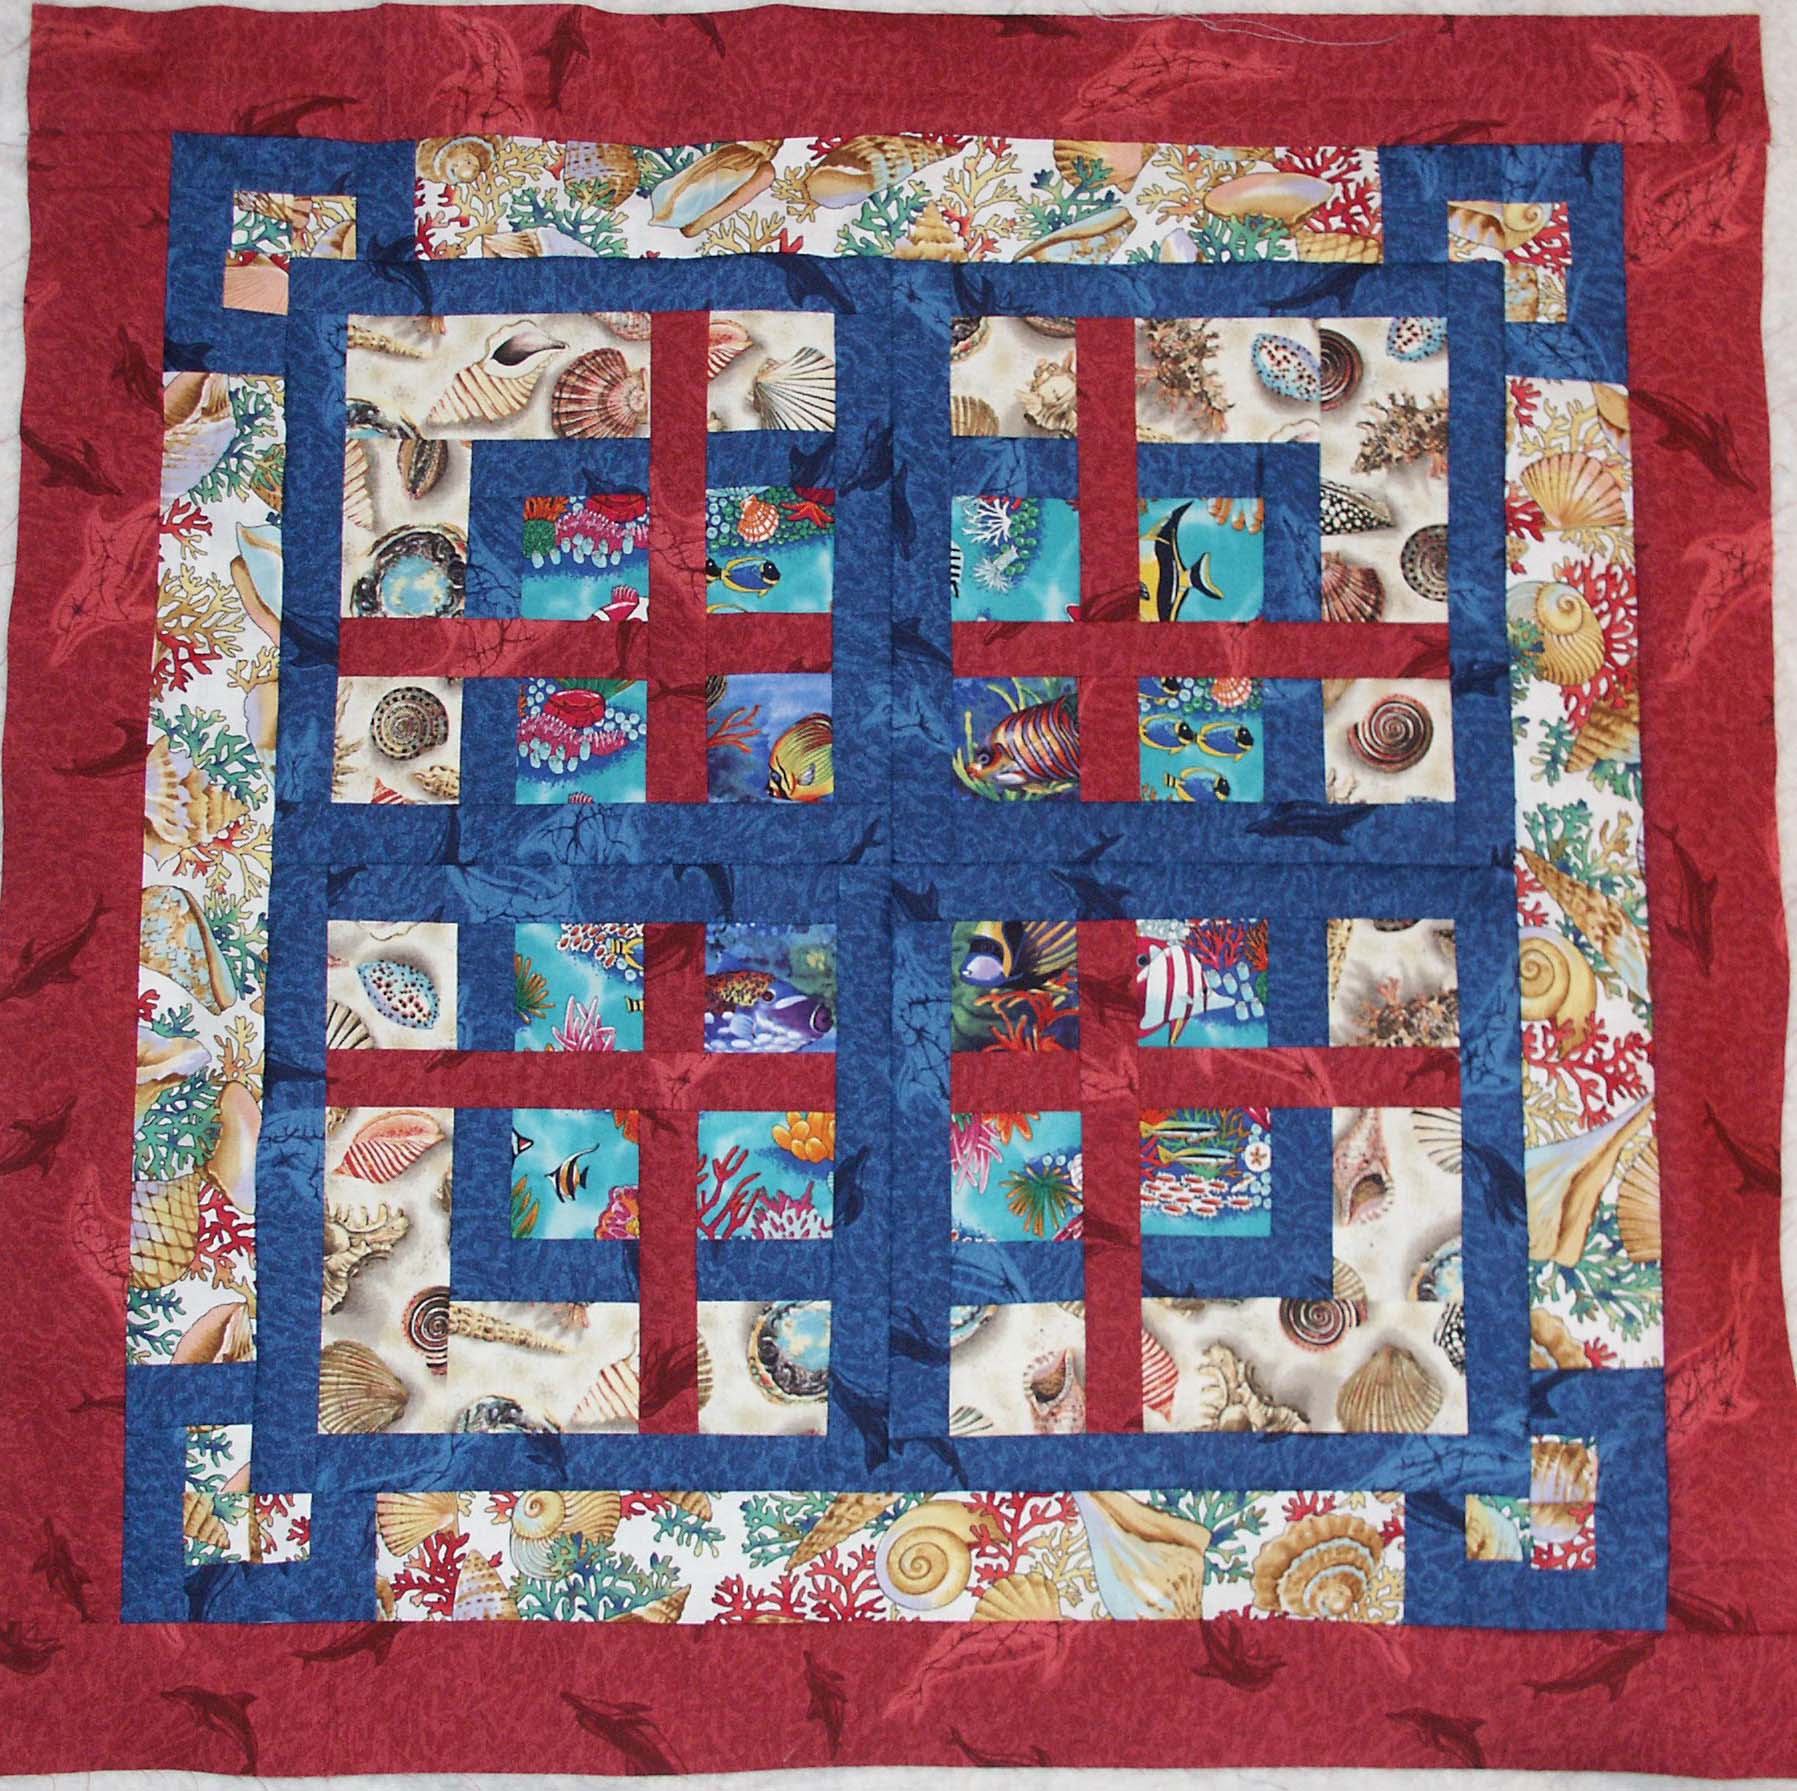
This was a small group this time, only 6 sewers.  In addition to our core group of me, Ken, Cindy, and my God-children Emerald and Azureen, we were joined by Pat from Lowell, Mass.  We all sort of worked on different projects this time.  Ken and Cindy wanted to learn how to do braid quilts (one of Anne’s specialties), Pat was working on a pinwheel quilt, Azureen did a bunch of little projects, including making some quilted purses, and Emerald went off and did a project of her own invention, with amazing results.

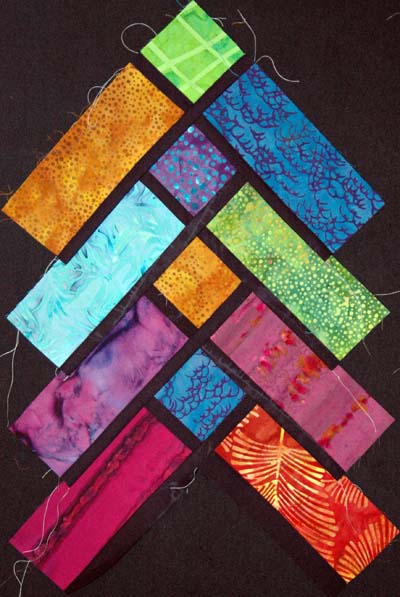
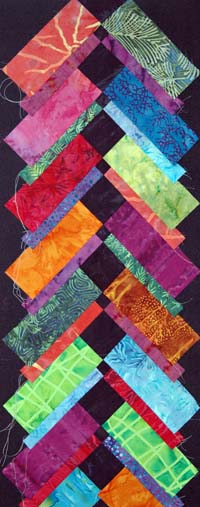
As for me, I had already taken Anne’s braid class at Quilter’s Way, so Anne decided I should just play around with braid variations.  She did not arrive until Friday afternoon, but she had Susan deliver a piece of graph paper with a diagram of a braid variation and the notation “For Rick to make”.  Here’s Anne’s original version:

Annes First

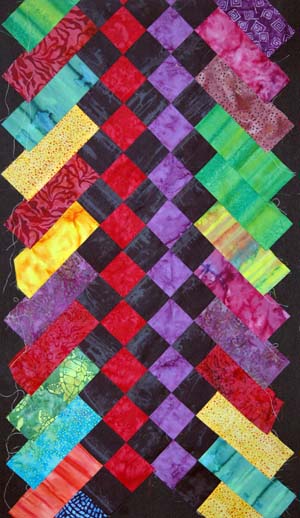
The variation here was the additional two square blocks around the braid points, one in color, one in black.  This was interesting, but it created a bit of separation between the braid units that sort of lost the braid effect.  I suspect it would show up a little better if paired with additional braid units.

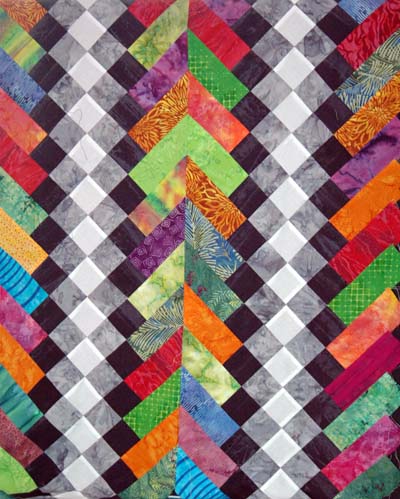
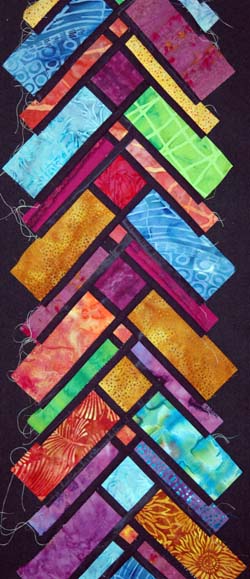
Next I decided to try something a little more complicated.  The colored squares were nice, but a block made with half-square triangles would look right at home there.  Here is variation #2.

Half Square

This one worked out great!  The half squares in the middle created a nice point of interest in the middle, but also enhanced the appearance of the braids rather that creating a big space between them.  A bit more complicated to make.  I was glad I had brought my Easy Angle ruler with me, since I had only brought 2 1/2 inch strips with me.

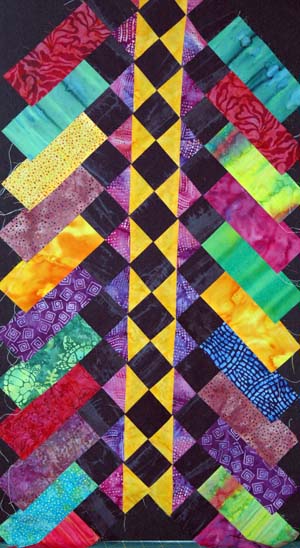
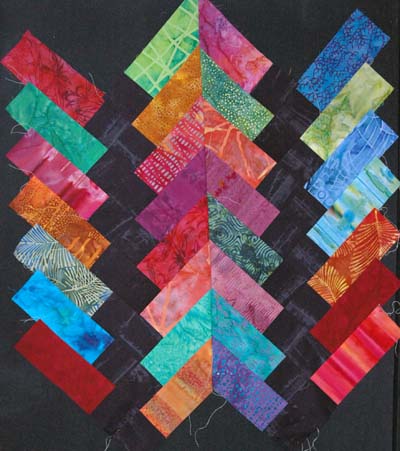
I was not ready to give up on the first variation yet.  I felt it was still possible to create some unifying structure in the middle using just squares, but a little more interesting color structure was needed.  By this time it was lunch, so we combined a lunch run with a trip to Quilt-A-Way fabrics.  At Quilt-A-Way, I picked up some gray and white fabrics.  When I got back to the machine, I used these fabrics with the black to create a gradient in the middle.  This time I made two braid strings and combined them.

Black and White

This was “way cool”!  The center stripe became the focal point, and the braid strips created a nice frame around the stripes.

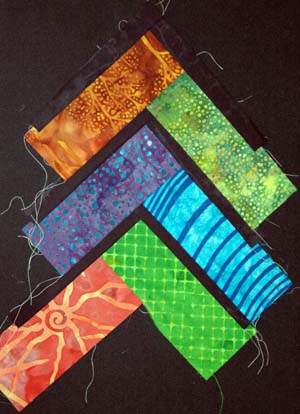
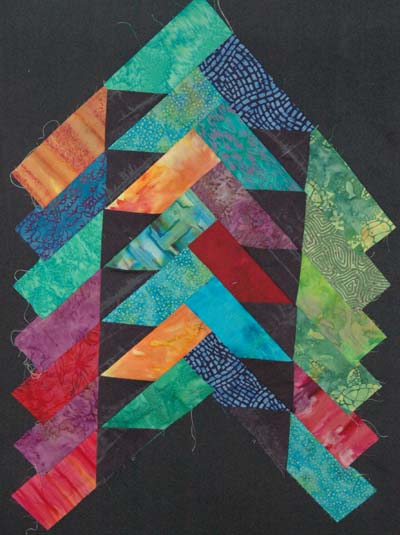
Now I was starting to roll.  One of the variations I’d used before used a black strip along side the braid to create a stained glass effect in the braid.  I decided it was time to try some variations on the black leading.  My first attempt was pretty much a flop…amazingly, the only real failure I had this weekend.

Nah

The attempt to use the short strips just didn’t work.  And it didn’t take too many rows to figure this out either.  I was pretty sure how it could be fixed, however. 

Leaded Squares

This was much better, and one of my favorite designs from the weekend.  Ok, one more variation on the leading.

Simple Leading

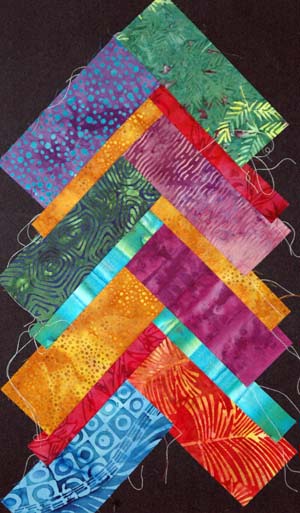
This one used the strips to separate entire chevrons.  The traditional use of the leading oriented the strips so each braid piece was completely framed.  I think this variation would work best if the same color strip was being used for both sides of the chevron.  Note the little goof I made here on the bottom.  I forgot which way I’d been sewing, so I switched sewing directions after the first chevron….oops!

This lead to experiments with varying the size of the braid strips, which produced a number of interesting effects.  Attempt #1 was essentially the same as the one above, but used colored strips cut to 1 1/4” rather than black 1” strips.

Two Sizes

This was a very nice effect.  I tried mixing narrow and wide strips on the same chevron, and also switching the wide/narrow sides back and forth. 

Meander

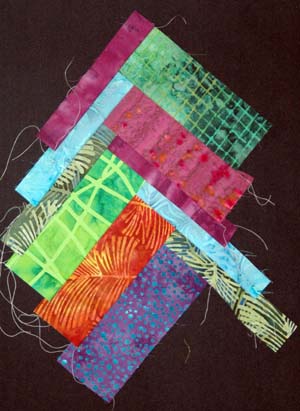
This was sort of interesting…not entirely sure how I’d use it, but it’s interesting none the less. 

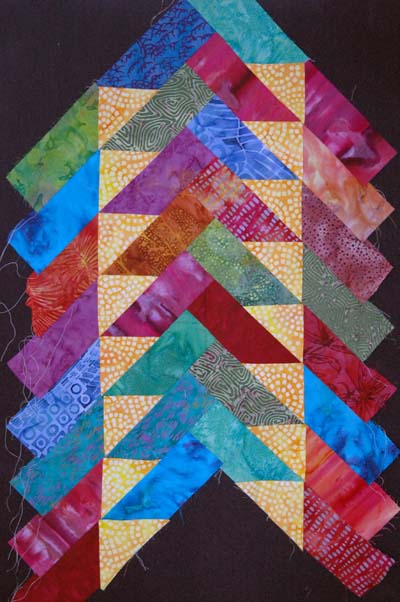
Another standard braid variation uses a black square at the point.  Anne suggested trying this with the different sized strips. 

Dual Squares

Another one in the “way cool” category.  The switch between the small black squares and the large black square was a very interesting effect.  This one lead me to try the version with the leading around the squares with the different sizes. 

Dual Leading

Wow!  I think this was my favorite variation from the weekend. 

By this point, I was starting to run out of ideas.  I thought it might be interesting to add a black square on the end of each chevron piece, rather than just a single piece used to create the blocks effect.  This created a zig-zag pattern down the middle of the braid.  This version again needed to be combined with a second braid to be affective:

Zig Zag

By this point, I was tapped out.  Pat suggested I try playing with the color placement instead of the structure.  I had picked up a bunch of sea color fabrics at Quilt-A-Way, so decided to try a gradient effect.

Gradient

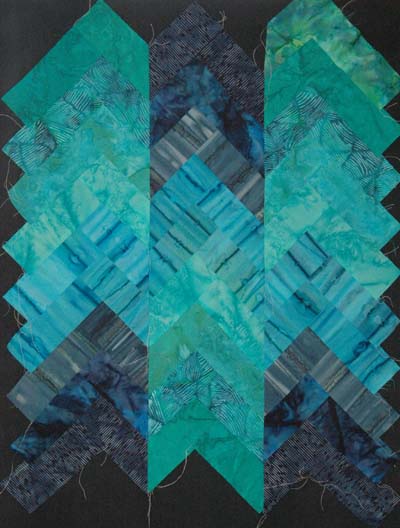
This was pretty neat.  I think I’m going to end up using this piece as the background for some sea life applique.  I’ll see what I can come up with here.

Ok, at this point, I was tapped out.  Fortunately, it was dinner time, so I was able to take a break.  Anne and I were batting around some ideas at dinner, and suddenly the light bulb went off….flying geese on the braids!

After dinner, I immediately jumped back into it.  Here’s my first flying goose attempt, using quick folded flying goose blocks on the chevrons.

Yellow Geese

I loved the movement this created, and I particularly like the way the braiding in the center section really stood out.  At this point, all sorts of possibilities around this motif were flying through my head.  I only had time to do a couple more, unfortunately.  The one above used long side strips on either side of the goose.  For my second version, I decided to use a black point block, and butt the goose strips up against the center block.

Delta Wing

This created an interesting delta-wing formation in the middle, as well as making the braid section part of the wings.  And my final variation of the weekend, which was essentially the same as the first flying goose block, but using black for the goose part.

Black Geese

Even though this is the same design as the previous one, it has a completely different look because of the change of fabric.  In this one, the geese are de-emphasized, and the braids stand out more strongly.

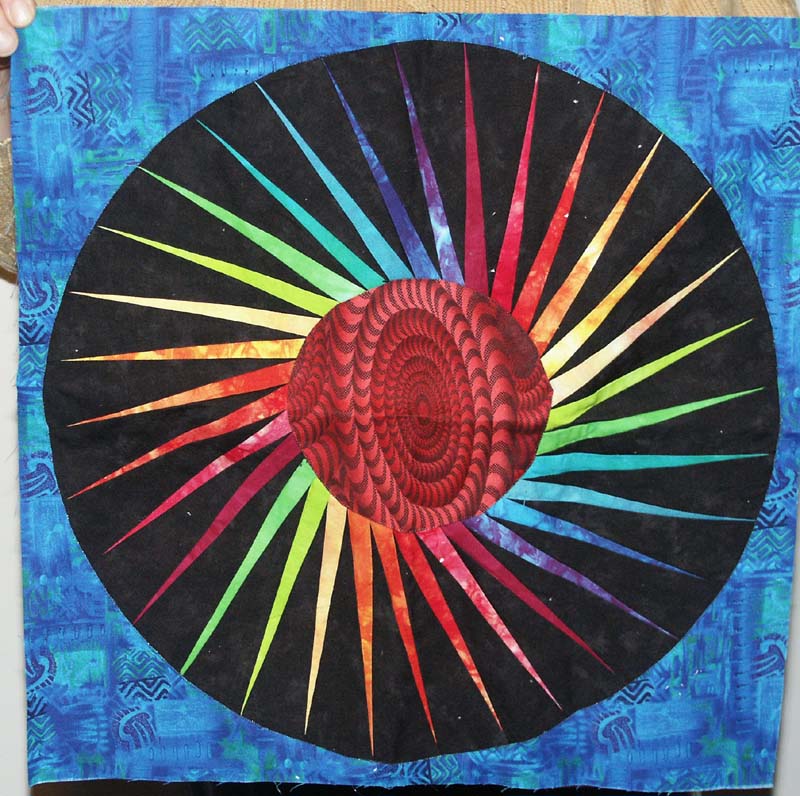
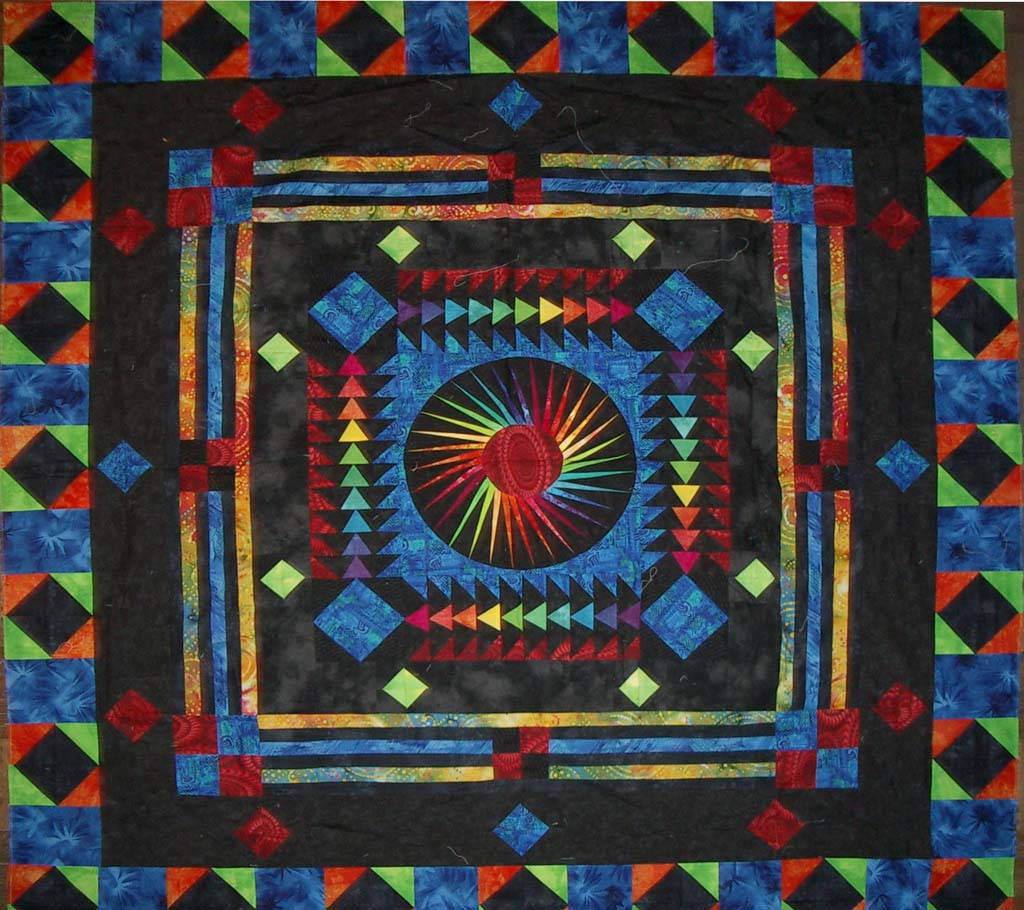
Well, that was the end of the weekend.  Since I’d just spent three weeks working rather intensely on Emerald’s graduation present, it was a very nice break to just sit and play with these designs.  At some point, I’m going to see if I can’t assemble all of these strips into a single sampler quilt.  This will certainly be an interesting challenge.

Monday, May 02, 2005

Do Androids Dream of Electric Quilts

Ok, I had the first round robin block in hand, and was trying to decide what to do.  This block was from my God-child Azureen.  Az already had in had a block she had made at our last Henry Farm Inn quilt weekend (the Christmas Star block).  She added two simple border around the block to bring it up to the suggested 18” and passed it along to me. 

The block used light and dark purples, some rainbow colors, and a light pink background.  The purples and rainbow colors were ok with me, but I didn’t really do light colors.  For a border idea, I “reused” an idea from a class I’d been taking at Quilt University (more on this topic later).  I was taking a class on Electric Quilt Borders and Layouts, taught by Fran Gonzolez.  I thought one of the borders Fran had used in the class was sort of neat, and decided to use it.  Electric Quilt made this fairly easy.  I drew up a block that roughly matched Az’s block, and sized to the same finished dimensions.  After that, it was a simple matter to draw the border around the block and print out paper templates for cutting.  This border design involved piecing together a number of long and skinny triangles, which was an interesting exercise.  I’d done something similar with some of the block bender quilts I’d made, so I managed to get by. 

I decided to use a rainbow color batik to mirror some of the rainbow colors that Az had used, but had a bit of a problem finding a light-valued batik that gave good enough contrast with the focus fabric.  This has been a general problem with my fabric stash, but slowly I’ve managed to fill in this hole.  The border came out really nice, but I think if I were to do this again, I’d have added a narrow dark colored border between Az’s outer most fabric and my border to give a little separation.  The rainbow colored outer edge of her block sort of fades into the border I added. Anyway, here’s the result.  I just discovered that I don’t have a picture of her quilt in completed form.  I’ll update this once I get picture of the final result.

An amusing aside on this one.  Several months later I was taking another Quilt University class on borders, and was describing the round robin project and how I’d been using border ideas I’d gotten for QU classes.  When I mentioned I’d used the triangle border from the Electric Quilt class, the instructor (Carol Miller) expressed real surprise that I’d made that one for real. Carol said that border was just an example intended to illustrate the EQ principles, and had never been intended to be used.  As far as she had known, nobody else had ever made that border.  Ah, the luxury of ignorance .


Friday, April 29, 2005

Testing BlogJet

I have installed an interesting application - BlogJet. It's a cool Windows client for my blog tool (as well as for other tools). Get your copy here: http://blogjet.com

"Computers are useless. They can only give you answers." -- Pablo Picasso

Trying out some new software for writing/editting my blog entries….this is my first real attempt, so here goes.

I’m off to Vermont this weekend for another weekend of quilting at the Henry Farm Inn.  The last couple of trips, I managed to get a ride up with my friend Candy, who was also taking the class.  Candy unfortunately has a conflict this weekend, and Anne Gallo is not going up until Friday, so I’m back to my old standard of taking the bus (sigh).  Paul, the proprietor of the Henry Farm Inn is graciously picking me up at the bus station when I get there.  Anne is giving me a ride back, which is usually a fun time.

We’re doing something a little bigger this weekend, spending all day Friday quilting in addition to the weekend.  This will give us plenty of time to spend at Quilt A Way, which is always a great shopping experience.  My Godchild Emerald is going to be picking out the backing fabric for her high school graduation present.  Note to self:  NEVER agree to make a quilt for somebody before reading the pattern instructions!

This is an interesting quilt to work on.  Emerald has completely redesigned it, elimating the flowery applique and replacing it with sea life.  This is also done in bright colors on dark backgrounds, with the borders and the connecting pinwheels done in sea-colors (purple-blue-green gradients). 

For a queen size quilt, 40 of the triangles are required.  Each triangle has 6 main units, plus 3 of the curved “fan” parts.  These are all paper pieced units.  Do the math…this is 360 paper pieced units, and sewing them all together requires sewing 120 curved seams…I’m so excited!  This will be beautiful when it’s done, but I’ve already accepted I’m not going to have it done by Emerald’s graduation day.


Thursday, April 28, 2005

Round and round the cobbler's bench

Round and round the cobbler's bench
The monkey chased the weasel,
The monkey thought 'twas all in fun
Pop! Goes the weasel.

A penny for a spool of thread
A penny for a needle,
That's the way the money goes,
Pop! Goes the weasel.

A half a pound of tupenny rice,
A half a pound of treacle.
Mix it up and make it nice,
Pop! Goes the weasel.

Up and down the London road,
In and out of the Eagle,
That's the way the money goes,
Pop! Goes the weasel.

I've no time to plead and pine,
I've no time to wheedle,
Kiss me quick and then I'm gone
Pop! Goes the weasel.

So what does this have to do with quilting? Absolutely nothing! However, I wanted to have a title with the word "Round" in it, because I'm going to write about Round Robin quilts. I was also going to title this "Round and round the MULBERRY BUSH", because that's how I always heard the song sung when I was a kid. I was surprised to learn it was the cobbler's bench instead, and there were more than just one verse. So, I present this for your edification.

Anyway, back to round robin quilts. This is the first in a series of articles about a round robin quilt project I was involved with my friends Marcia, Ken, and Cindy, plus my two Godchildren Emerald and Azureen. Each person was going to do a block, and then pass it to the next person to add a border, with the orignal block creator ending up with the quilt for finishing. Here were the rules:

  1. The orignal block was to be no more than 18" finished. 18" was picked because Marcia just happened to have an 18" Hawaiian applique block she wanted to use...what the heck, we're easy!
  2. After the initial block, each person would add a border with a maximum width of 6". If the inner borders did not use the entire 6", you could use up that shortfall up to a maximum size of 8".
  3. The round robin order was me->Marcia->Emerald->Cindy->Ken->Azureen.
  4. Each person had 6 weeks to work on each step before passing it along....where were a tad flexible on the 6 week deadline :-)
  5. The original block creator got the finished quilt and responsible for finishing it however he/she saw fit. Adding a final border was fair game too.

I had a paper piecing pattern I'd been wanting to try, as well as a nice new rainbow gradient hand dye fabric assortment just looking for a project. The pattern was Spiraling Rays by Carol Bryer Fallert. And here was my resulting block.

This is definitely one of those "it's a lot harder than it looks project". The paper piecing made it pretty easy. The only tough parts were sewing the inner circle (which I picked because it made me thing of an eye) and the outer circle. This particular pattern handled the curves by turning the edges of the convex part under, then sewing along the edge with transparent thread and a zig-zag stitch. This took me an afternoon to finish.

After send it along to Marcia, I got a request from her for any extra of the outer blue fabric I'd sent her.

Here is the finished quilt I got back. My friends definitely understand my liking of bright colors on a dark background! This is definitely a quilt that needs to be seen in person rather than a photo. In real life, the fabrics positively glow!

One neat feature I'd like to point out is the outer-most border. This was sewn by my Godchild Azureen, and uses a technique she learned from Anne Gallo during a quilt weekend at the Henry Farm Inn. The squares are made from a pair of 3D flying geese. The outer triangles are folded rather than pieced along that edge, giving each one a little pocket and dimensional effect. I have not quilted this yet, but it is definitely at the top of the UFO list. This will get finished once I complete Emerald's high school graduation (!) quilt.

Next up, border #1 for Azureen's block.

Monday, April 18, 2005

Tiger, tiger, burning bright....

We're finally up to one of those major moments in my quilting life...one that probably stands right up there with my first quilt and the "Uncle Rick, do you notice how worn this is getting"? moment that got me quilting again. Back in May, when my friends and I took our first quilt class at the Henry Farm Inn, we had asked our instructor (Deb Tucker) for recommendations for a class in the fall schedule. Of the classes available, Deb recommended we try the class taught by Anne Gallo and Susan Raban. Deb thought we might enjoy this class because Anne and Susan have a pretty relaxed teaching style. The instructor in the other class had a reputation for being quite the stickler for accuracy, which probably wouldn't be as much fun for us. So, Anne and Susan it was!

The other major change for this class was the discovery of Quilt-a-Way fabrics on the first trip. We had learned about them at the class, and had tried to stop in when we left on Sunday, but the shop was closed that day :-( We took no chances this time, and had called ahead to make sure they'd still be open by the time we got there on Friday. It was not a pretty sight! We were wheeling around office chairs (the Quilt-a-Way version of a shopping cart) piled with stacks of fabrics. The prices were very good, and while I didn't realize it at the time, I was planting the seeds of my love affair with batik fabrics. I picked up a number of nice batiks here from their very large selection.

The plan for this class was a little bigger than the last class. This time, Azureen was signed up for the class too. The last time we came up, Emerald was the exhausted teenager, and slept most of the trip. We were sort of expecting a repeat performance this weekend, but Ken and Cindy did bring along an extra sewing machine in case she got inspired.

When we arrived at the Inn, several people were already there, so we sat around and chatted for a bit. At the first Henry Farm class I took, I had missed the bit about bringing along some quilts for a first night show-and-tell session. This time I was a bit more prepared, bringing along a number of quilts. Among those I showed was Magic Tiles, Rainbow Illusion, and Fade to Black.
I was a bit eager to jump the gun, so I showed off the quilts I'd brought along a little early. I didn't realize it at the time, but one of the people I was showing my stuff to was Anne Gallo, one of the instructors.

Before dinner, Anne and Susan gave us a little lecture about the project we were going to be working on this weekend. Anne started out by saying that there were a few "over achievers" in the class...and demonstrated that fact by grabbing my quilts and showing them to the rest. I'll never forget the little smirk on her face when she described my Rainbow Illusion quilt as my "first paper piecing project". I knew already I was going to get along with this woman! At dinner that night I discovered Anne's maiden name was the same as my last name, and Anne has been referring to me as her "long lost cousin" ever since. I also discovered she and I share a very compatible sense of humor!

The project for this class was a pattern called The Christmas Star. Not a very difficult block, but one that looks very nice set on point. I decided this quilt was going to be a Christmas present for Emerald, so found some nice tiger fabric to use as a focus fabric (Em is nuts about tigers). Oh yeah, around the same time, I'd started taping Simply Quilts on my Tivo box. On one of the episodes, Alex Anderson had mentioned that many quilters had a fear of working with orange. I couldn't think of a single reason why orange would be intimidating...but I also can't resist a challenge. Orange it would be! And hand-dyes, of course. I'd really developed a taste for hand dyed fabrics by that time. This was going to be interesting, and since I already had a plan for who it would end up with, I was fairly certain to finish this one too.

When we started sewing, Em decided she wanted to work on something too, and started asking me questions about how to do the Magic Tiles style quilt. Susan and Anne picked up on her questions, and started helping her with a project. Azureen, meanwhile, whipped right through putting together a couple of Christmas star blocks, and Anne started pulling out additional project for her to work on too. Anne and Susan appeared to have the best time working with those two, and the small quilts they produced came out beautifully. I was so proud of those two girls that day...despite their tendency to raid Uncle Rick's fabric supply :-)

On my quilt, I jumped right to it. I worked until midnight that night, with a lot of help from Anne. By midnight, all of the blocks were assembled, and laid out on a bed ready to be sewn together, but I was pretty exhausted at that point, and headed off to bed. I am very much a morning person, so I was back up a 5 to sew it all up. Anne is also an early riser, so she was up with me helping. With the two of use furiously working together, we managed to get the top assembled by 11, when we needed to have everything wrapped up. I was beat, but had a nice quilt top all ready for finishing. It didn't really come out exactly the way I'd designed it on Electric Quilt. The different colored hand-dyed stars were intended to be more of a focal point of the quilt, but the orange accent parts sort of "took over". Even with that, I was still pleased with the result, and Em loved getting it. And Az managed to con me out of my Around the Twist quilt I'd done back in May.

After I finished this, I discovered that Anne and Susan tended to run these classes at a pace where the students would just piece together a couple of blocks of the project, since the intent was just to teach certain sewing skills. I was the first person who'd ever done a complete top in the single weekend (groan!).

Afterwards, Anne graciously offered me a ride home, since she lives in the Boston area. We had a nice chat on drive back, and we met for lunch out at Quilter's Way after New Years (the day after Ohio State won the national championship!).

Thursday, April 14, 2005

Any sufficiently advanced technology....

"Reality is merely an illusion, albeit a very persistent one." (Albert Einstein)

Magic Tiles was a quilt I created from a pattern I purchased from the website of a woman from whom I purchased a number of fat quarter assortments off of eBay. At this phase of my quilting journey, I was searching for different styles of quilts to attempt, with a preference for wall hanging sized quilts. This quilt is also a bit of departure for me since it is primarily purple, rather than my preferred color wheel style. It does, however, continue my preference for black as a background fabric.

Even though I had just recently finished a pair of braid quilts that used hundreds of colors, including a wide variety of purples, I concluded I just didn't have enough "good" purples to give me a nice selection of 9 different fabrics to make this quilt. That's pretty typical for me...regardless of how large my fabric stash becomes, the quilt I'm currently working on always seems to require something I don't have. Amazing how that works out, no?

Anyway, it was off to the quilt shop again. This time it was my first trip to Cambridge Quilts. Even though this is in Cambridge, just across the river from Boston, this shop is not easily reachable via public transportation. To get there, I need to take the T up north, then either take a bus to the shop or walk slightly over a mile from the T station to get there. Since I actually enjoy walking, I chose the latter option.

This was a fairly nice shop, with a reasonable fabric selection. I've not been back since this one trip, but that was largely because of the inconvenience of getting there. I was able to flesh out my selection of purples rather nicely on this trip. I also added a number of other fabrics to my supply. When I took my stack of fabrics up to the cutting table, the cutter inquired as what I was making. I sort of gave the off-the-cuff reply "a fabric stash". I've come to use that phrase an amazing number of times since then!

Anyway, Magic Tiles came together fairly quickly. This was a variation on a "stack-and-slash" quilt, where you stack 9 different fabric blocks and do a series of cuts and shuffles. When the cuts are sewn back together, you end up with 9 different blocks for your quilt. Even though I'm sure I followed the instructions in Magic Tiles pattern correctly, I must have made a mistake in the reshuffling somewhere, as each block has only 8 unique fabrics. One fabric is duplicated in each block. This is definitely in the category of a mistake that needs to be pointed out to be noticed. Oops, I guess I just did that :-)

This quilt sort of sat in my finished pile for a while, until this Christmas when I gave it to my sister-in-law Jeannette as a stocking stuffer. This was an attempt on my part to deflect attention from the fact I still had not dyed some wool yarn for her like I had promised :-)